© Minister of Supply and Services Canada 1975
Cat. No. A73-1406 ISBN: 0-662-001551-6
Revised 1975; Reprinted 1980 8M-5:80
Copied and re-formatted for the Web by ![]() Squeeze
Squeeze
[2]
| Grape wine 10 | |
| Fruit wines 16 |
Things to Remember 21
Glossary of Terms 21
More and more people are becoming interested in preparing various fruit juice products at home. Improvements in equipment and techniques have made the methods for preparing juices, wines, and cider both simple and practical.
apple juice
Use only mature, sound apples for making juice. All commonly grown varieties with the exception of Delicious and the very early summer apples give a juice of good quality. Juices from the Delicious variety are too low in acid to be used alone, therefore blend them with more acid juices in amounts not exceeding 20 to 25%.
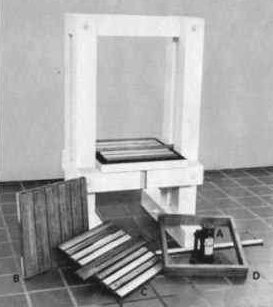
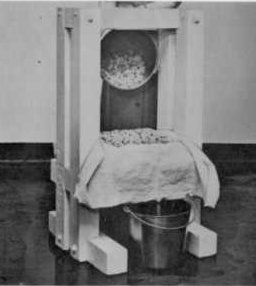
A pulpy type of apple juice can be made by using almost any home juice machine, but if a clearer juice is desired a hammer mill and press must be used (Figures 1 to 5 below). This equipment is easy to use, and for economy a number of families can share the cost. The drawing and general description of the juice press (Figure 3) have been adapted from Circular 194 of the New York Agricultural Station, Geneva, N.Y. Contact with iron or copper may cause discoloration, off-flavor, and cloudiness, therefore, all equipment coming in contact with the juice should be made of stainless steel, glass, or plastic (Figure 6). Some plastic paints are suitable for coating iron equipment.


Fig.1 & 2 HammerMill Shredder
Figure 2. Apple mill with hopper open. A. 1/2 hp heavy-duty motor, 1750 rpm, 5/8-in, shaft. B. 5/8-in, flexible coupling. C. Steel blades 3/16 x 1 1/2 x 7 3/4 in. straight ends. D. 3/4-in, shaft threaded for locking nuts, G. The thread on one end is reversed so that the locking nuts tighten when the blades rotate. Both ends of the shaft are turned down to 5/8 in. Spacers between blades are 7/16 in. long and can be cut from 3/4-in, pipe. E. 5/8 in. self-aligning permanently lubricated bearings, which lock to the shaft. F. Half-round 8-in. diam 12-gauge steel screen perforated with 1/2-in, holes. The holes are drilled on the points of equilateral triangles that have 7/8-in. sides. G. Locking nuts. H. Hopper (can be fabricated from fiberglas). Ofiset 220° from the vertical. Throat is 4 x 8 in. 12-gauge. Section around the screen is 8 x 8 in. Discharge below the mill is 7 x 7 in. Height of discharge to floor is 12 in.
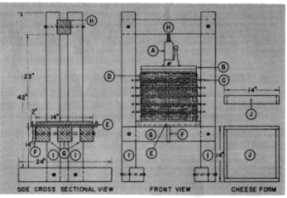
Boil new cotton cloths in water for 5 min and rinse. Dampen them before use. After each use, wash the cloths thoroughly by changing the water often and dry them well before you store them. To use the press, place a rack on the press base. Put the cheese form on the rack and cover both with a press cloth. Pour the product to be pressed on the cloth, as in Figure 5, to make a cheese 2 in. thick. Fold the cloth neatly into the center of the cheese and remove the cheese form. Place another rack above this cheese and repeat the procedure until there is only space for the jack support, B, and the jack. Center the jack on the jack support and apply pressure evenly.
1. Mill and press the fruit, and strain the juice through
clean
cheesecloth. Juice extracted in this way is cloudy, or "opalescent,"
and
may be used without further clarification. However, if a clear juice is
desired add the enzyme pectinase at the rate of ¼ teaspoon/gal
(4
litres). Allow the treated juice to stand overnight and then siphon the
clear liquid free from the sediment. Pectinase is available under
various
trade names, such as Pectozyme and Clarase, from stores carrying home
wine
makers' supplies and some food specialty and drug stores. It should not
be confused with pectin, the material used in making jellies.
Juices may be fortified with vitamin C by adding ascorbic acid at the
rate of ½ teaspoon/gallon (4 litres) just before the containers
are filled. Dissolve it in a small amount of juice or water, add this
to
the main batch, and stir well. This treatment helps to preserve the
color
and gives a vitamin C content equivalent to that of most citrus juices.
The juice may be stored without further treatment in the home deep
freezer.
Cardboard milk cartons make useful containers, if they are cleaned
well,
or any plastic container of approx. 2 litre size.
2. Heat the clarified or unclarified juice to 200°F (93°C) in an acid-resistant container.
3. To prepare plain tin cans, wash them thoroughly in hot water, rinse with boiling water, and invert to drain. Pour the hot juice into the cans, seal the cans, and invert them for 2 to 3 min. Cool the juice by putting the cans into cold water immediately. Fast cooling gives a better-flavored juice.
4. If glass sealers are used, wash them and sterilize by heating in an oven to 190 - 200°F (88 - 93°C), or use an automatic dishwasher set on the sanitizing cycle. Boil or scald the lids. Fill the containers completely, seal or cap them and stand them in water at 110°F (43°C) until cool. Place crown-capped bottles on their sides for a few minutes before cooling to sterilize the caps.
5. Store the filled containers upright in a cool place.
Juices prepared in this way develop some sediment during storage, but when they are opened and the liquid is poured off carefully, most of the sediment remains in the bottom of the container. This sediment is completely wholesome and affects only the appearance of the juice.
juices other than apple
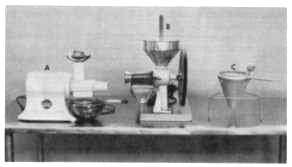
Fig. 7
Juices from fruits other than apple usually contain some pulp, and the equipment for making them (Figure 7) is much simpler. Several types of juice extractors do a good job. The best ones (A and B) operate on the principle of a tapered screw that presses the juice through a surrounding tapered screen and extrudes the waste material from the end. Another one extracts the juice by steam (not shown), but yields a diluted juice with a cooked flavor. In another type the fruit contacts a rapidly spinning toothed disc and the juice is expelled by centrifugal force. Unfortunately, this type tends to incorporate air into the juice. The cone-shaped food press (C) is the cheapest, but a great deal of work is involved in making a relatively small amount of juice.
1. Stem fully ripe tomatoes, and trim them to remove all moldy material.
2. Pulp the tomatoes in a preserving kettle and bring the pulp to a boil as quickly as possible.
3. Pass the hot pulp through a juice extractor or sieve to remove the skins and seeds.
4. Sterilize sealers or bottles as described for apple juice.
5. Add salt at 1 tablespoon/gal of extracted juice (12 cm3 /4 litres) and reheat the juice to the boiling point.
6. Quickly pour the juice into sealers, bottles, or cans, and seal the containers; do not leave any headspace. Excessive air in the headspace causes serious loss of vitamin C during storage. The juice must be at a temperature of at least 200°F (93°C) when the containers are being filled.
7. Invert cans for 3 to 5 min to sterilize the lids, and then cool them in cool water. Place bottles on their sides to sterilize the caps, and air-cool them, or water-cool them as in step 4 for apple juice. Sealers must be cooled in the upright position in order for a proper seal to be made; because the lids will have been sterilized beforehand, inverting the jars is unnecessary.
Grape Juice
For the best flavor use fully ripened grapes, free from mold. Concord type varieties give a fruity, highly flavored juice. Varieties such as New York Muscat give a strongly muscat-flavored juice, which may be diluted to taste with juice from neutral- flavored grapes, or with apple juice.
1. Remove the stems and crush the grapes enough to release the juice but not to break the seeds.
2. Heat the pulped fruit to 145-150°F (63-66°C) to extract color and other soluble materials. Avoid prolonged heating because it extracts excessive tannin from the seeds and skins, which may cause bitterness or off-flavors.
3. After heating, press the pulp in a juice press (Figures 3,4, and 5) or pass it through a juice extractor (Figure 7) to remove the skins and seeds.
4. When necessary, strain the juice through cheesecloth to remove the large particles of pulp. If storage at 28-30°F (-2 to -1 °C) is available, hold the juice at this temperature for 24-48 hr to allow sediment to settle out. Pectinase (see page 4) may be added at this point to speed clarification.
5. Siphon the clear juice free from the sediment and heat to 180-185°F (82-85°C) for 3 min. Dispense into clean, air tight bottles. Cap them immediately and cool as in step 4 for apple juice. After prolonged storage some tartrate (cream of tartar) may settle out. When the bottles are opened, pour the juice carefully so that the sediment is not disturbed.
Freshly pressed unheated juice may be stored in milk cartons in the deep freezer. For this purpose, the grapes may be pressed cold. Add one Campden tablet (see page 13), pectinase, and ascorbic acid at ¼ teaspoon /gal (4 litres) to preserve color and allow the juice to settle for several days to one week at 28-30°F (-2 to -10°C). The clear juice may then be drawn off and dispensed into the containers and frozen.
[9]
Apricot, Prune, and Peach Juices
These juices are made in much the same way as tomato juice. Use fully ripe fruit to obtain the best color and flavor.
1. Prepare the apricots and prunes by halving, pitting, and pulping. Remove peach skins by using a hot-water blanch as in canning, and then halve, pit, and pulp the peaches.
2. Place the prepared fruit in a suitable preserving kettle, add water at 2 cups to each 5 lb of fruit (11 kg) and stirring constantly, bring the mixture rapidly to a boil.
3. Pass the hot pulp through a juice extractor to remove skins and fibres.
4. To make the extracted juice into a full-bodied drink, add sugar at 1 lb to each 5 gal of juice (0.4 kg/20 litres). To make a lighter product, dilute the extracted juice with an equal amount of a syrup prepared by dissolving 1 lb of sugar in ½ gal of water (0.5kg/ 4 litre).
5. Reheat the juice to boiling and pour it into sterilized containers. Sterilize the containers and cool the juice as in step 4 for apple juice.
For peach juice with a distinctive flavor, to each 4 cups (litre) of
undiluted juice add 1- 2 tablespoons (16 - 32 ml) of frozen orange
concentrate
and 1- 2 teaspoons (5 - 10 ml) of lemon juice or 1 tablespoon (16 ml)
of
lime juice, or 2 - 3 tablespoons (32 - 64 ml) of frozen grapefruit
concentrate,
according to taste.
Apricot juice blended with apple juice makes a pleasantly flavored
drink.
Black Currant Juice
Black currants, an excellent source of vitamin C, make a tasty fruit juice.
1. In a suitable kettle, add 1 cup of water to each pound of black currants (0.5 litre/kg) and, stirring constantly, bring the mixture to a boil.
2. Carry out the extraction, reheating, filling, capping, and cooling as outlined from step 3 for tomato juice.
3. Before reheating and filling, dissolve 7 lb of sugar in each gallon of juice (3.5 kg 4 litres).
4. Before drinking the juice, dilute it with an equal quantity of water. A delicious drink can be made by mixing one can of black currant juice with three cans of apple juice.
5. Store black currant juice at a temperature below 77°F (25°C) in the dark, so that it will retain its attractive color and delicate flavor.
Miscellaneous Juices
Appetizing juices may be made from many of the less common wild and cultivated fruits by following the general principles outlined here. Because of the danger of spoilage and loss of flavor, low-acid vegetable juices such as carrot and cabbage should not be preserved by heat, but they may be frozen. How ever, since these vegetables store well, it is much better to make fresh juice when it is wanted.
Freezing Juices
Any of the above juices may be frozen and stored in a home freezer.
Cool the juice quickly after it has been extracted from the heated
pulp.
Pour the juice into suitable freezer containers or containers with
plastic
liners. Paper milk cartons can be washed and used for this purpose. To
allow for expansion during freezing, do not fill the containers beyond
about ¾ full.
Wine is usually made by fermenting the pulp or juice of grapes, but delicious "wine" can also be made from all common fruits and even some vegetables.
Equipment
Use only glass, plastic, or earthenware utensils for fermenting the pulp or juice. Contact with iron or copper causes the wine to darken, and zinc-coated (galvanized) containers may produce unpleasant flavors. Avoid enamelware containers, particularly if the coating is chipped. Stoneware crocks are the most convenient for fermenting pulped fruit, and glass or plastic carboys are the best for fermenting juice. The narrow neck of the carboy permits the use of a fermentation-lock stopper, which does not allow air or fruit flies to enter the carboy.
Clean all utensils thoroughly and rinse them with boiling water before use. Wooden barrels, if used for storing wine, should be free from the musty or vinegary odors caused by molds and bacteria. Sterilize them by soaking for 24 hrs with a solution prepared by dissolving 8-10 Campden tablets in 5 gal (20 litres) of water. After this treatment rinse the barrels thoroughly with water.
When storing barrels empty, keep them dampened and add a little of the above solution from time to time.
Preparing the Pulp or Juice
Grapes should be picked when they are fully ripe and the sugar content and flavor are at their peak. Remove the stems and crush the grapes to release the juice. Avoid crushing the seeds because this may cause bitterness in the finished wine. A wooden plunger may be used to crush large quantities of grapes (or take off your shoes and socks....!).
Red wines are made by fermenting the skin, pulp, and juice together for an initial period - the skins impart the red color.
For white wines, the juice is preferably extracted before fermentation, but a satisfactory white wine can be made from white grapes fermented with the skins left on. However, the juice should be separated from the pulp after no more than 24 hours of fermentation for best results.
When all the fruit has been thoroughly crushed or the juice extracted, and measured, add 2 Campden tablets, ¼ teaspoon of ascorbic acid, and pectinase according to the directions on the package, to each gallon (4 litres) of juice or 10 lb (4.5 kg) of pulped fruit. Stir the mixture and allow it to stand at room temperature for 24 hrs.
Campden tablets are composed of potassium metabisulphite, which when added to the juice releases sulphur dioxide. This "sterilizes" the juice by weakening wild yeasts, molds, and bacteria, which if present may cause an undesirable vinegary or musty flavor. It also helps to preserve the color and flavor of the wine. Campden tablets are sold by stores that specialize in wine producers' supplies. They are much more convenient to use than the powdered metabisulphite. However, if the powdered form is used, a scant ¼ teaspoon and no more, is the equivalent of 2 tablets.
Ascorbic acid in conjunction with metabisuiphite prevents oxidation and undesirable color and flavor changes in the wine.
Pure cultures of wine yeasts in the form of packaged dry yeast or tubed agar cultures may be bought at stores that specialize in wine producers' supplies. They are selected yeast strains, capable of growing in the presence of sulfur dioxide, able to produce high concentrations of alcohol, and give a clean-flavored wine. Their use minimizes the risk of having the wine spoiled by the formation of vinegar. Bread yeasts are not recommended as a wine culture because the amount of alcohol they produce is insufficient to preserve the wine.
For making 5 to 10 gal (20 - 40 litres) of wine, rehydrate one package of dry yeast per instructions on the package, and add to the must (crushed grapes or juice), and when islands of bubbles appear, stir the mixture and allow it to ferment at 65 - 75°F (18 - 24°C) in a dark place.
To use a tubed agar culture, first fill the tube containing the culture with juice that has been sterilized by boiling and cooled to about 100°F (38°C). As soon as froth or bubbles appear, which means that fermentation is starting, pour the liquid into a gallon (4 litres) of sulfited juice.
When making more than 10 gal (40 litres) of wine in one batch, it is best to prepare a starter. To do this, make a small batch of wine from either the packaged dry yeast or the agar culture. After about 24 hr, when this small batch is fermenting strongly, add it to the main lot of must. Use the starter in the proportion of not less than 1 gal to 25 gal of must (4 litres to 100 litres).
Pressed juice for white wines may be fermented to completion in a large glass bottle or carboy with a fermentation lock in place to exclude fruit flies and to allow gas to escape.
The fermentation of pulped fruit may be carried out in a crock
covered
with cheesecloth or plastic film (a "primary"). A heavy cap of skins
will
rise to the surface and must be stirred in at frequent intervals. After
3-4 days (24 hr in the case of white wines) siphon off the free run
juice
into a clean carboy for further fermentation. If the juice remains on
the
pulp too long, it will extract excessive flavor and bitterness from the
seeds and skins. Apply only gentle pressure to the drained pulp to
extract
the wine remaining in it.
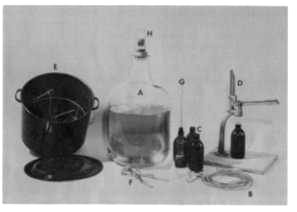
Figure 6. Small equipment and supplies. A.
Five-gallon
glass or plastic carhoy. B. Four feet of ½ in, plastic
or
rubber tubing. C. Beer bottles for cider or juice. D.
Capper.
E.
Canner with rack. F. Tongs to fit bottles. G.
Thermometer
reading to 230°F (110°C). H. Fermentation lock.
Addition of Sugar
The amount of alcohol and sweetness in the finished wine depends on the amount of sugar in the juice. If the grapes are low in sugar, extra sugar may be added before fermentation.
The total sugar content, including the natural sugar present in the grapes, should not be more than 20% for good dry table wine. If more than this amount is present, the wine will have a harsh flavor because of too much alcohol. Two parts of sugar will usually produce about one part of alcohol and one part of carbon dioxide. A sugar content of 20% will therefore produce 11-12 % alcohol in a completely fermented wine, the best concentration for table use. For dessert wines, which are sweeter, the alcohol may be increased to 14-15% by using a total sugar content of 24%.
Use a hydrometer to measure the sugar. The instrument should be calibrated in percent sugar (Balling or Brix scale) and should cover a range from 0 to 35%. Hydrometers are available from stores that specialize in home wine makers' supplies or from scientific supply houses.
A simple calculation for the amount of sugar to add is this. Draw a rectangle. At the top left corner write the percent sugar content you have as measured by a hydrometer. At the bottom left write 100 (sugar is 100%). In the center write 20, the desired sugar percentage (24 for high-alcohol wines). Subtract the smaller value at top left from the center value and write the difference at bottom right. Subtract the center value from the larger value at bottom left and write the result at top right. The top right value is the proportion of juice and the bottom right value is the proportion of sugar to use to give the desired concentration. For example, if these values come out to 80 and 4 then for each 80 lb (36 kg) of juice or pulp add 4 lb (1.8 kg) of sugar or one part sugar to 20 parts of juice.
If the juice or pulp has been weighed accurately and the correct amount of sugar calculated to give 20 or 24%, the yeasts will convert all of this sugar to alcohol and carbon dioxide to give a dry wine.
When the production of gas slows down and finally stops, sediment begins to settle on the bottom of the carboy. Unlike other fruits, grapes contain a high proportion of tartaric acid, which gives the harsh flavor to new wine. The sediment consists of yeast cells and tartrates or "wine stone".
Shortly after the fermenting stops, rack the wine by siphoning it carefully off the sediment into a clean carboy or glass jug. Always keep containers filled to the neck. To speed up the removal of tartrates, the wine may be chilled almost to the freezing point after fermentation is complete. Repeat the racking procedure at intervals until no more sediment forms. Racking also incorporates a small amount of air, which helps to hasten the aging process.
If the wine is too acid, a small amount of precipitated chalk may improve it. Add not more than ¼ teaspoon /gal (4 litres) a little at a time until the desired acidity is reached. Additional sediment will settle out if this is done.
Usually the wine will clear very well with these treatments, if it has been made properly. If cloudiness persists, fining with bentonite may clear the wine. Mix 1 teaspoon of the powder in a little water and stir into each gallon (4 litre) of wine. Carefully remove the settled sediment by racking after 4 or 5 days. Bentonite is available at wine supply shops.
Gelatin has been used for fining, but it is not recommended because problems may arise from its use.
The wine should be brilliantly clear after these treatments and it is then ready for bottling. If it is too dry for the individual taste, sweeten it by adding sufficient sugar. One to 2 % sugar will reduce the sour taste of an acid wine and improve its body.
To avoid the possibility of further fermentation in the bottle add 1 or 2 Campden tablets to each gallon (4 litres) before bottling. One-quarter teaspoon of ascorbic acid to each 2 gal (8 litres) will ensure that the color and flavor are maintained.
Fill the bottles to the neck and seal with new tight corks or new screw caps. Champagne-type bottles with plastic stoppers are very good. Bottles must be well sealed to prevent air from spoiling the wine. Thirteen-ounce (369-ml) or 26-ounce (738- ml) seal better than larger bottles.
Aging
Wine may be stored in wooden barrels to age, but this is not essential if chilling and fining have been properly carried out after the fermentation. If you use a barrel, make sure it is clean and has no musty or vinegary odor. Barrels that have been used for brandy, whiskey, rum, or wine may be used for aging.
Always fill the barrel completely and do not leave the wine too long in the barrel. For barrels with a capacity of 10 gal (40 litres), store the wine for no longer than 6 weeks before bottling.
Wine matures in bottles, but more slowly than in a barrel. If a heavy deposit forms on standing, transfer the wine into clean bottles by pouring carefully to avoid disturbing the sediment. This treatment adds small amounts of air, which help to smooth a harsh-flavored wine. Do not partly fill bottles because this causes loss of color and sometimes spoilage, but fill them to the neck and store in a cool dark place. Store bottles with cork stoppers on their sides to prevent the corks from drying out.
Concentrated grape juices may be used where fresh fruit is not available. These may be purchased from stores specializing in wine-making materials. Directions for their use are given on the tins.
If you cannot make the wine soon after the grapes have been picked, you may store them. Stem and crush the grapes, add ascorbic acid and Campden tablets, and place them in the freezer until you are ready to proceed. Pressed juice for white wines may be treated in the same way.
The general procedures for preparing fruit wines are similar to those for making grape wine. Because some fruits are high in flavor and acid, dilute the pulp or juice with water before fermenting.
Most fruits contain less natural yeast nutrients than grapes, and because the fruit juice may be further diluted with water, it is best to add some yeast nutrients. They are available from wine equipment suppliers, and usually come in powdered form with directions for their use. If they are not available, 1 teaspoon of malt extract added to each gallon of juice or pulp is a good source of yeast nutrients.
The following procedures have produced acceptable wines. The
suggested
proportions of fruit to water have proved satisfactory, but the
proportions
may be varied to suit individual taste. Always use well-ripened fruit,
but be sure it has no rot or mold.
Apricot, Peach, and Prune Wines
1. Halve, pit, and thoroughly mash the fruit.
2. Weigh the pulp, add an equal amount of water, and while stirring constantly, bring the mixture to a boil.
3. To each 6 lb (3 kg) of the mixture add 1 lb (0.5 kg) of sugar and cool to 100°F (38°C). Add 2 Campden tablets and ¼ teaspoon of ascorbic acid to each gallon (4 litres) or 10 lb (4.5 kg) of pulp together with pectinase according to the suppliers directions. Mix well and allow to stand for 24 hr. Add yeast nutrient as directed on the package.
4. Inoculate with yeast as described for grape wine in the sec tion "Yeasts and Fermentation".
5. After 48 hr, siphon the free-run juice from the pulp into a clean carboy, place the fermentation lock in position and ferment to completion.
6. Rack the wine and treat it in the same way as grape wine,
except that no chilling is necessary.
Cherry Wine
1. Mash whole ripe cherries.
2. Proceed as directed from step 2 for apricot, peach, and prune
wines.
Loganberry and Raspberry Wines
1. Mash ripe berries and add 1 gal of water for each 3 lb of
berries (4 litres/1.5 kg).
2. Add 1 lb (0.5 kg) of sugar for each pound (0.5 kg) of
berries.
3. Add Campden tablets, ascorbic acid, and pectinase as in step
3 for apricot, peach, and prune wines.
4. Inoculate with yeast as described in the section "Yeasts
and Fermentation" for grape wine.
5. Ferment for 7 days, siphon off the juice, and let it continue
to ferment until finished.
Because the wine from both these fruits is high in flavor and acidity,
it is most pleasant when slightly sweet. Add sugar before bottling,
remembering
to add also 2 Campden tablets and ¼ teaspoon of ascorbic acid to
each gallon (4 litres).
1. Remove the fruit from the stems and crush the berries.
2. Add ½ gal of water for each pound of fruit (5 litres
kg).
3. Add 1 lb of sugar for each ½ gal of this mixture (1
kg/4 litres).
4. Add 1 Campden tablet and pectinase to each ½ gal (2
litres) of pulp, mix well, and let the mixture stand for 24 hr.
5. Proceed as for loganberry and raspberry wines. Ascorbic acid
is not necessary because currants are high in this substance.
Dandelion Wine
1. To each 3 qt (3 litres) of dandelion flowers add 1 gal (4
litres) of water, and boil for 15 to 20 min.
2. Strain off the flowers, and to each gallon (4 litres) of
liquid add 3 lb (1.4 kg) of sugar, 3 sliced lemons, 1 sliced orange,
and
yeast nutrient.
3.To each gallon (4 litres) of the resulting mixture add 2
Campden
tablets, stir well, and let the mixture stand for 24 hrs.
4. Inoculate with wine yeast and ferment for 8 to 10 days.
Siphon
the clear liquid from the sediment. Continue fermentation, and rack at
intervals until the wine is clear before bottling.
Parsnip Wine
1. Wash the parsnips and cut them into small pieces.
2. To each 4 lb of parsnips add 1 gal of water (to 2 kg add
5 litres), bring the mixture to a boil, and simmer for 20 to 30 min.
3. To each gallon (4 litres) of pulp add 3 lb (1.4 kg) of sugar,
3 sliced oranges, 3 sliced lemons, and yeast nutrient.
4. To each gallon (4 litres) of pulp add 2 Campden tablets,
stir, and let the mixture stand for 24 hrs.
5. Inoculate as described for grape wine in the section "Yeasts
and Fermentation".
6. Siphon the clear juice from the pulp after 48 hr and allow
it to ferment until finished.
7. Rack the wine at intervals until it is clear, and then bottle
it.
This recipe may be used for other vegetables such as beets, turnips,
marrows, and carrots.
1. To 10 lb (4.5 kg) of rhubarb cut in small pieces, add 2
gal
(8 litres) of water and cook until soft (as stewed rhubarb).
2. Strain off the pulp through cheesecloth.
3. Add precipitated chalk to the juice until the acidity has
been removed, as indicated by a very bland flavor. This removes
undesirable
oxalic acid. Allow the treated juice to stand until the sediment
settles
and siphon off the clear juice.
4. Add Campden tables, ascorbic acid, and pectinase as for other
wines.
5. To each gallon add 4 lb of sugar (5 litres add 2 kg) and
the required amount of yeast nutrient.
6. Inoculate and ferment as described for grape wine in the
section "Yeasts and Fermentation".
7. Before bottling, add citric acid to the wine to replace the
oxalic acid removed by the chalk. Dissolve crystalline citric acid
(obtained
from the wine supply store) in a little water and add until the desired
tartness is obtained.
If a sweet wine is desired, add more sugar and remember to add more
Campden tablets to prevent bottle fermentation.
Cider of the best quality is made from a blend of juices of different apple varieties. Varieties such as McIntosh or Winesap when used alone may give slightly unpleasant flavors. Jonathan yields a cider too high in acid for some tastes. Blends that have proved satisfactory are those containing 75% Delicious and 25% McIntosh or equal parts of Delicious and McIntosh, Jonathan, Newtown, or Winesap.
The following process yields an almost dry, lightly carbonated cider with an alcohol content slightly higher than that of beer.
Containers for Fermentation
Glass or plastic carboys or stoneware crocks are suitable containers in which to ferment the juice. During fermentation stopper carboys with a fermentation lock. Cover stoneware crocks with a suitable cloth such as fine cheesecloth.
Strain the freshly pressed juice through cheesecloth to remove coarse particles of fruit. To each gallon (4 litres) of juice add 2 Campden tablets and pectinase as directed on the package, stir well, and let the mixture stand for 24 hr. This treatment prevents darkening of the cider and destroys wild yeasts and vinegar-producing bacteria.
Fermentation
Inoculate the juice with a wine yeast as describe for grape wine in the section "Yeasts and Fermentation". The fermentation rate depends on the temperature and on the amount of sugar in the juice; fermentation should take 5 to 10 days min, and up to 4 - 6 weeks at cool temperatures. Nearly all the sugar will then have been used by the yeast. Completion of the fermentation may be judged by the slowing down of gas bubbles rising to the surface and the absence of sweetness. Leave the cider for 2 or 3 days to settle and clear, and then siphon it free from the sediment.
Before bottling, add 1 to 3 oz (28 to 85g ) of sugar to each gallon (4 litres) - 3 oz gives a sweet cider. Fill the bottles leaving 1 to 1½ in. (2.5 - 3.8 cm) of headspace, cap them, and hold at 70 °F (21° C) to allow bottle fermentation to take place. The carbon dioxide produced gives the cider sparkle or head. Open a trial bottle each day, and if enough carbonation has developed, the cider is ready to be pasteurized.
Pasteurization
Place the bottle upright on the bottom rack of a canner or double
boiler,
and cover the bottles completely with water. Fill one uncapped bottle
with
water and raise it from the bottom so that the neck is above the water
level. Put a thermometer into a cork so that the bulb is at the center
of the bottle when the cork is in place resting on the neck of the
bottle.
Heat the water until the thermometer in the test bottle registers a
temperature
of 150°F (66°C); pasteurization is then complete.
Remove the bottles from the water and place them on thier sides on
several layers of newspaper. After 2 or 3 min placece the bottles in
warm
water and leave them at room temperature until the cider is cool.
Store the containers of finished cider in an upright position in a cool place. The sediment should settle completely after 10 to 12 days, leaving clear liquid on the top. The cider should be ready to drink after about a month. When pouring the cider be careful not to pour out any sediment, if you wish a clear sparkling glass.
Still Sweet Cider
To make a clear still cider add about ½ lb of sugar to each gallon of freshly pressed juice (0.25 kg /4 litres). Ferment until the degree of sweetness is to your taste and then stop the fermentation by adding 3 Campden tablets to each gallon (4 litres) and allow the cider to clear by settling and frequent racking in a cool place. Bottle when it is clear. Pasteurization is not necessary.
1. Use a pure culture wine yeast.
2. Use Campden tablets.
3. Ferment and store wine in the dark.
4.Ferment at 70°F (21°C). Store at 50 - 60°F (10 - 16°C).
5. Do not leave wine in small barrels for more than 4-6 weeks. Keep full.
6. Use new tight corks, screw caps, or plastic stoppers.
7. Bottle in 13- or 26-oz (369- or 738-ml) bottles.
Acetic - vinegar flavor
Brix degrees - percent sugar
Balling degrees - percent sugar
Dry - no sugar left
Lees - sediment
Must - crushed fruit or juice before or during fermentation
Oxidized - spoiled by exposure to air
Racking - separation of wine from pulp or lees
Semi sweet wine - with about 2 - 3% sugar
Sweet wine - with 6% sugar or more
Copied and re-formatted for the Web by ![]() Squeeze
Squeeze